Server - Windows
Configuring the server
- Unzip the downloaded zip file into a folder you wish it to be.
- Download and Install Node.js v14.17.1 - x64.
Only required if it's not already installed. - Run the start.bat file.
- On a Successful start you will see the following:
D:\Server Directory>node index.js
LOG:  Roboteur Server version 7.4.x started on http://localhost:3035/api
DEBUG:  mail storage synced
DEBUG:  Sync schedules
LOG:  setup complete
DEBUG:  Service reactions sync complete
DEBUG:  Service schedules sync complete
DEBUG:  Macro dev runs clears 0
DEBUG:  Stale connections cleared
DEBUG:  checkpoint setup
DEBUG:  machine not registered - getting machine account sys info...
DEBUG:  Virtual-fs entities seeded at version 7.3.1
DEBUG:  machine registered
DEBUG:  Virtual-fs shapes seeded at version 7.3.0
DEBUG:  machine checkpoint setup fcacc708-8c58-4712-9782-d182ec35e8f2
DEBUG:  Shape field-types seeded at version 4.0.0
DEBUG:  Detection sync complete
DEBUG:  Job commands seeded at version 7.3.8
DEBUG:  Macro commands seeded at version 7.3.11
Prerequisites
Prerequisites
- Node.js is a required package to have in the server environment.
- If you want to access the server remotely you are required to open a port on your network, change the config
hostto your public IP and theportnumber to the one you opened in your network settings.
Possible Errors
Experienced Errors
- If the server starts and closes directly, you will need to manually build the server setup in your environment, please follow the manual setup below.
- If you struggle to access the server remotely, please checkout the server config
server/config/config.jsonand see if thehostandportis set to your public IP and open Port number.{ "host": "127.0.0.1", "port": 3035, } - If you Register an account but you cannot access the
roboteur dashboard, please check that the forceVerification config is set tofalse{ "forceVerification": false, }
Server Configurations
Warning
- Do not change configurations if you are uncertain of what the impact will be!
- Only change configurations that are listed inside of the table.
| Key | Default | Description |
|---|---|---|
| host | localhost |
The public IP of the network if the server needs to be accessible remotely |
| port | 3035 |
The port number that is publically accessible, the port must be open through the network |
| paginate | {"default": 1000, "max": 50000 } |
When tables inside of the dashboard exceeds 1000 rows, the table will paginate into multiple "pages" of rows. |
| smtp | {"host: "your-host", "port": 587, "auth":{"user": "your-username", "pass":"your-password"}} |
If you want to forceVerification, enable users to verify their accounts or enable users to reset their passwords, itis required to add your smtp credentials so that mails can be sent through events like account registration, reset-password, etc. |
{"transport":"smtp", "service":"mail"} |
In the config you are required to change _mail to mail in order to activate the email event functionality, else no mails will be sent even if you allocated a smtpaccount. |
|
| management | {"path": "http://localhost:5000/account/", "from": "noreply@spacepencil.co.uk"} |
The path must be the remote IP so that the buttons inside of the emails can redirect the user to your dashboard, thefrom email should be the same email as your smtp accounts username. Do not change the brand, you will confuse your users. |
| authentication | {"forceVerification": false} |
ForceVerification will disallow users to access the dashboard if their accounts has not been verified when set to true, this is a security feature to disallow fraudusers to use your application. |
Minimum system requirements
| Title | Description |
|---|---|
| Processor | Intel® Core™ i5-11400F Processor (12M Cache, up to 4.40 GHz) |
| Ram | 16GB DDR 4 |
| Hard Drive Space | 250Gb |
| Media codecs | true |
| OS | Windows, Linux, Windows Server 2012 to 2019 |
Install Roboteur as a windows service
- Download nssm
- Copy the
nssm.exefor 32-bit or 64-bit - Paste it into the Roboteur server folder
- Open a
terminaland navigatecdto the Roboteur server folder - Run
nssm install - You will see the window of nssm open
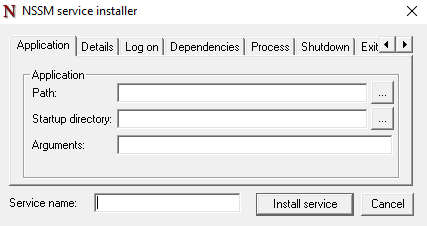
- Select the path to the
start.batfile in the roboteur server folder - Enter the service name
Roboteur server - Click on the details tab
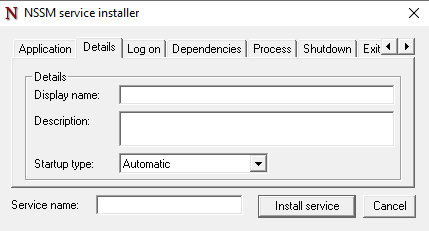
- Enter the display name
Roboteur server - Click
install service